📚《深入浅出JVM字节码》
《Java虚拟机字节码:从入门到实战》的开源版本。作者通过自己的实战经验,整合出一套适合新手的高效学习教程。归纳并提炼知识点,制定合理路线,帮助读者更快掌握核心技术。
动手实现class文件结构解析器
可用于分析class文件结构的工具有很多,笔者将其分为两类:一类是基于十六进制的分析工具,如010editer、UE;另一类是可视化的class文件结构分析工具,如开源的classpy1。为能让读者更好的理解class文件结构,本书将介绍如何使用Java语言编写一个解析class文件的工具类项目,通过该项目实现class文件的解析,并从编写该项目的过程中慢慢掌握class文件结构。
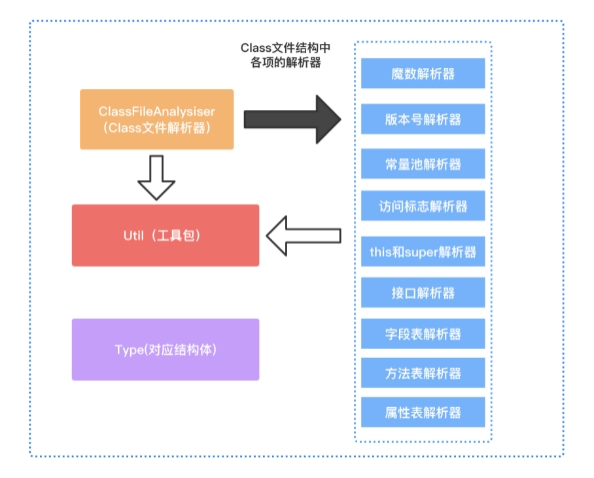
首先,根据 class文件结构以及class文件的解析流程设计该项目的技术架构图,如下图所示。

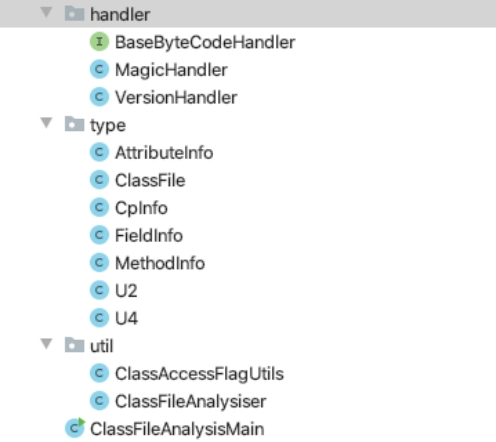
接着,根据架构图搭建项目的框架,框架搭建如下图所示。

我们先定义对应class文件结构中各项结构的类型(type包),如常量池(CpInfo.class)、字段表(FieldInfo.class)、方法表(MethodInfo.class)、属性表(AttributeInfo.class)、U2(class文件结构的基本单位,占两个字节)、U4(class文件结构的基本单位,占四个字节);再定义各项的解析器(handler包),如魔数解析器、版本号解析器等;最后通过工具类ClassFileAnalysiser使用责任链模式协调各个解析器的工作完成class文件的解析。
在框架搭建好后,我们再开始编码完成各个解析器。
根据 class文件结构创建ClassFile类,ClassFile类代码如下。
public class ClassFile {
    private U4 magic; // 魔数
    private U2 minor_version; // 副版本号
    private U2 magor_version; // 主版本号
    private U2 constant_pool_count; // 常量池计数器
    private CpInfo[] constant_pool; // 常量池
    private U2 access_flags; // 访问标志
    private U2 this_class; // 类索引
    private U2 super_class; // 父类索引
    private U2 interfaces_count; // 接口总数
    private U2[] interfaces; // 接口数组
    private U2 fields_count; // 字段总数
    private FieldInfo[] fields; // 字段表
    private U2 methods_count; // 方法总数
    private MethodInfo[] methods; // 方法表
    private U2 attributes_count; // 属性总数
    private AttributeInfo[] attributes; // 属性表
}
ClassFile类中的每个字段是按照class文件结构中各项的顺序声明的,其中CpInfo、FieldInfo、MethodInfo、AttributeInfo这几个类目前并未添加任何字段,只是一个空的类,代码如下。
public class CpInfo {
}
public class FieldInfo {
}
public class MethodInfo {
}
public class AttributeInfo {
}
U2和U4是class文件结构的基本单位,长度分别为两个字节和四个字节,我们需要为这两种基本单位创建对应的Java类。这两个类都只需要一个字段,类型为Byte数组,长度在构造方法中控制,要求构造方法必须传入数组每个元素的值。
U2:
public class U2 {

    private byte[] value;

    public U2(byte b1, byte b2) {
        value = new byte[]{b1, b2};
    }

    public Integer toInt() {
        return (value[0] & 0xff) << 8 | (value[1] & 0xff);
    }

    public String toHexString() {
        char[] hexChar = new char[]{'0', '1', '2', '3', '4', '5', '6', '7', '8', '9', 'A', 'B', 'C', 'D', 'E', 'F'};
        StringBuilder hexStr = new StringBuilder();
        for (int i = 1; i >= 0; i--) {
            int v = value[i] & 0xff;
            while (v > 0) {
                int c = v % 16;
                v = v >>> 4;
                hexStr.insert(0, hexChar[c]);
            }
            if (((hexStr.length() & 0x01) == 1)) {
                hexStr.insert(0, '0');
            }
        }
        return "0x" + (hexStr.length() == 0 ? "00" : hexStr.toString());
    }

}
U4:
public class U4 {

    private byte[] value;

    public U4(byte b1, byte b2, byte b3, byte b4) {
        value = new byte[]{b1, b2, b3, b4};
    }

    public int toInt() {
        int a = (value[0] & 0xff) << 24;
        a |= (value[1] & 0xff) << 16;
        a |= (value[2] & 0xff) << 8;
        return a | (value[3] & 0xff);
    }

    public String toHexString() {
        char[] hexChar = new char[]{'0', '1', '2', '3', '4', '5', '6', '7', '8', '9', 'A', 'B', 'C', 'D', 'E', 'F'};
        StringBuilder hexStr = new StringBuilder();
        for (int i = 3; i >= 0; i--) {
            int v = value[i] & 0xff;
            while (v > 0) {
                int c = v % 16;
                v = v >>> 4;
                hexStr.insert(0, hexChar[c]);
            }
            if (((hexStr.length() & 0x01) == 1)) {
                hexStr.insert(0, '0');
            }
        }
        return "0x" + hexStr.toString();
    }
}
提示:为便于验证解析结果是否正确以及解析结果的可读性,我们还给这两个类添加了一个byte[]转int的方法(toInt),以及byte[]转16进制字符串的方法(toHexString)。
接着我们需要创建一个接口BaseByteCodeHandler,抽象出class文件结构各项的解析器行为。每个解析器应该只负责完成class文件结构中某一项的解析工作,如常量池解析器就只负责解析常量池。
BaseByteCodeHandler接口:
public interface BaseByteCodeHandler {
    /**
     * 解释器的排序值
     * @return
     */
    int order();

    /**
     * 读取
     * @param codeBuf
     * @param classFile
     */
    void read(ByteBuffer codeBuf, ClassFile classFile) throws Exception;
}
BaseByteCodeHandler接口定义了一个read方法,该方法要求传入class文件的字节缓存2和ClassFile对象。每个继承BaseByteCodeHandler的解析器都可以在read方法中从字节缓存读取相应的字节数据写入ClassFile对象。
由于解析是按顺序解析的,因此BaseByteCodeHandler接口还定义了一个返回排序值的方法,该值用于实现解析器的排序。比如,版本号解析器应该排在魔数解析器的后面,因此,版本号解析器order方法的返回值应该比魔数解析器order方法的返回值大。
有了解析器之后,我们还需要实现一个管理和调度解析器工作的总指挥:ClassFileAnalysiser ,代码如下。
public class ClassFileAnalysiser {

    private final static List<BaseByteCodeHandler> handlers = new ArrayList<>();

    static {
        // 添加各项的解析器
        handlers.add(new MagicHandler());
        handlers.add(new VersionHandler());
         ......
        // 解析器排序,要按顺序调用
        handlers.sort((Comparator.comparingInt(BaseByteCodeHandler::order)));
    }

  // 将传入的从class文件读取的字节缓存,解析生成一个ClassFile 对象
public static ClassFile analysis(ByteBuffer codeBuf) throws Exception {
  // 重置ByteBuffer的读指针,从头开始
       codeBuf.position(0);
        ClassFile classFile = new ClassFile();
        // 遍历解析器,调用每个解析器的解析方法
        for (BaseByteCodeHandler handler : handlers) {
            handler.read(codeBuf, classFile);
        }
        return classFile;
    }

}
ClassFileAnalysiser 的静态代码块负责实例化各个解释器并排好序。
ClassFileAnalysiser 暴露analysis方法给外部调用,由analysis方法根据解析器的排序顺序去调用各个解析器的read方法完成class文件结构各项的解析工作,由各项解析器将解析结果赋值给ClassFile对象的对应字段。
analysis方法的入参是class文件内容的字节缓存,从class文件中读取而来。在该项目中使用ByteBuffer而不直接使用byte[]缓存加载的class文件,是因为使用ByteBuffer能更好的控制顺序读取。
假设我们已经实现了所有解析器,那么我们只需要实现将class文件加载到内存中,再调用ClassFileAnalysiser的analysis方法就能实现将一个class文件解析为一个ClassFile对象,例如。
public class ClassFileAnalysisMain {

    public static ByteBuffer readFile(String classFilePath) throws Exception {
        File file = new File(classFilePath);
        if (!file.exists()) {
            throw new Exception("file not exists!");
        }
        byte[] byteCodeBuf = new byte[4096];
        int lenght;
        try (InputStream in = new FileInputStream(file)) {
            lenght = in.read(byteCodeBuf);
        }
        if (lenght < 1) {
            throw new Exception("not read byte code.");
        }
        // 将字节数组包装为ByteBuffer
        return ByteBuffer.wrap(byteCodeBuf, 0, lenght).asReadOnlyBuffer();
    }

    public static void main(String[] args) throws Exception {
        // 读取class文件
        ByteBuffer codeBuf = readFile("xxx.class");
        // 解析class文件
        ClassFile classFile = ClassFileAnalysiser.analysis(codeBuf);
        // 打印魔数解析器解析出来的Magic
        System.out.println(classFile.getMagic().toHexString());
    }

}
当然,这只是整体的框架搭建,class文件结构各项的解释器还没有实现。接下来,我们就按照解析class文件结构的顺序实现各项解析器。
发布于:2021 年 07 月 10 日
作者: 吴就业
链接: https://github.com/wujiuye/JVMByteCodeGitBook
来源: Github Pages 开源电子书《深入浅出JVM字节码》(《Java虚拟机字节码从入门到实战》的第二版),未经作者许可,禁止转载!
- classpy是一个开源的class文件结构分析工具:https://github.com/zxh0/classpy
- class文件字节缓存是指从class文件读入内存的字节缓存,这是一个数组,大小即为class文件的大小。
📚目录